Let's Encrypt - Azure Cloud Service
This document aims to explain how to use ZeroSSL to obtain and set up a free Let’s Encrypt SSL certificate for use with a website hosted on a Microsoft Azure Cloud Service (classic).
This may be useful to you if:
- You’re a developer
- You maintain one or more websites
- You’d like them to have the benefits of HTTPS
- But, you don’t want to spend any money on an SSL certificate
And also if:
- You use Microsoft Windows
- Your websites are written in ASP.NET MVC
- Your websites are hosted in Microsoft Azure using a Cloud Service (classic)
And lastly, if:
- You have a spare 30 minutes or so and some patience
SSL certificates from Let’s Encrypt are only valid for ninety days, so a subset of these steps has to be repeated when (or just before!) the certificate expires. Ideally you should have a mechanism in place for automatically renewing the certificate, but as yet I’ve not been able to figure out how to do this when using a Cloud Service.
A Microsoft Azure Cloud Service is different to a Web App. If you’re using a Web App then this guide probably isn’t for you as there is a Let’s Encrypt Site Extension that should give you what you need for less work.
![]() OK, so, here goes…
OK, so, here goes…
Pre-requisite Steps
These only have to be done once.
Website Setup - ACME Protocol
Let’s Encrypt grants SSL certificates only for domains that we control. This is checked through a process known as Verification.
Verification is done via the ACME Protocol. For lots more information, see How It Works.
All we need to know is that during the Verification process, Let’s Encrypt will visit a URL of the form
http://mydomain.com/.well-known/acme-challenge/<challenge>
on our website(s), at which they expect to see a specific response. The <challenge> value is unique for each domain (and subdomain), and changes each time we go through Verification.
The
<challenge>andresponsevalues for our domain(s) will be given to us later on
To support this, we can add a controller that contains two endpoints:
- A
GETendpoint (with suitable routing) that will respond to.well-known/acme-challenge/<challenge>requests - A
POSTendpoint that allows us to set up the<challenge>andresponsevalues
This is for an ASP.NET MVC website that uses the .NET Framework. It should be easy to adapt it for .NET Core
using System.Collections.Generic;
using System.Web.Mvc;

namespace Richev.Examples
{
    [RoutePrefix(".well-known")]
    public class LetsEncryptController : Controller
    {
        /// <summary>
        /// A GUID that should be kept secret, that needs to be known in order to POST a challenge response.
        /// A sort of poor-man's authentication mechanism.
        /// </summary>
        private static readonly Guid _secret = Guid.Parse("TODO: replace this with a GUID that you generate");

        /// <summary>
        /// The endpoint that Let's Encrypt will call when verifying domain ownership.
        /// </summary>
        [Route("acme-challenge/{challenge}")]
        [HttpGet]
        public virtual ActionResult Index(string challenge)
        {
            var response = (string)HttpContext.Cache[challenge];

            if (string.IsNullOrEmpty(response))
            {
                return HttpNotFound();
            }

            return Content(response);
        }

        /// <summary>
        /// An endpoint that allows you to upload each of the Let's Encrypt challenge strings,
        /// and their respective expected responses.
        /// See below for an example PowerShell script for doing this.
        /// </summary>
        [HttpPost]
        public ActionResult ChallengeResponse(ChallengeResponseModel challengeResponse)
        {
            if (!challengeResponse.IsValid(_secret))
            {
                return new HttpStatusCodeResult(HttpStatusCode.BadRequest);
            }

            HttpContext.Cache.Add(
                challengeResponse.Challenge,
                challengeResponse.Response,
                null,
                DateTime.Now.AddHours(1),
                Cache.NoSlidingExpiration,
                CacheItemPriority.Default,
                null);

            return Content($"Added '{challengeResponse.Challenge}' to cache.");
        }
    }

    public sealed class ChallengeResponseModel
    {
        private const int UnexpectedlyLongString = 500;

        public Guid? Secret { get; set; }

        public string Challenge { get; set; }

        public string Response { get; set; }

        public bool IsValid(Guid secret)
        {
            return !string.IsNullOrWhiteSpace(Challenge) &&
                   !string.IsNullOrWhiteSpace(Response) &&
                   Challenge.Length < UnexpectedlyLongString &&
                   Response.Length < UnexpectedlyLongString &&
                   Secret.HasValue &&
                   Secret.Value == secret;
        }
    }
}
In order for the routing to work, add routes.MapMvcAttributeRoutes() in your RouteConfig.
public class RouteConfig
{
    public static void RegisterRoutes(RouteCollection routes)
    {
        routes.IgnoreRoute("{resource}.axd/{*pathInfo}");

        routes.MapMvcAttributeRoutes(); // here!

        // ...etc
    }
}
After adding this controller to your website, be sure to redeploy and test that the endpoints are working by POSTing a dummy
<challenge>andresponseand seeing that you can GET them. You can perform the POST using a tool such as Postman, or using a PowerShell script like the one listed later on.
Website Setup - Bonus Step - Forcing HTTPS
Configuring an SSL certificate for HTTPS is great, but of limited benefit if your existing users continue to arrive at your website(s) using HTTP. So, it seems appropriate to redirect any requests that use HTTP over to HTTPS.
There are various ways to achieve this in ASP.NET MVC, but I chose to create an attribute that inherits from RequiresHttpsAttribute, that redirects unless the host is localhost. Simple to use, and doesn’t get in the way when testing locally.
using System.Web.Mvc;

namespace Richev.Common.Web.Attributes
{
    public class RequireHttpsUnlessLocalhostAttribute : RequireHttpsAttribute
    {
        protected override void HandleNonHttpsRequest(AuthorizationContext filterContext)
        {
            if (!filterContext.HttpContext.Request.Url.Host.Contains("localhost"))
            {
                base.HandleNonHttpsRequest(filterContext);
            }
        }
    }
}
Add this attribute to all of the controllers where you want to enforce HTTPS.
PC Setup - OpenSSL
Later on, we’ll have our shiny new SSL certificate and private key. But, to get the certificate file we’ll actually use, we will need to add the private key to the certificate. We’ll do this using OpenSSL, so you need to have that installed on your PC.
Windows installers for OpenSSL are maintained by Shining Light Productions. You’ll probably need the 64-bit ‘light’ installer. Download and install it.
Now that the pre-requisites are done, we can really get started…
Obtaining the SSL Certificate and Private Key
Now we use ZeroSSL, which will take us through three steps.
Details → Verification → Certificate
1. Details
Point your browser to https://zerossl.com/free-ssl/#crt and fill in your details
This is optional, but you can set it to receive certificate expiration reminder emails.
Domains
A list of the domains (and relevant sub-domains) for which you want the certificate to be valid for. For example:
mydomain1.com www.mydomain1.com subdomain.mydomain1.com mydomain2.com
Wildcard domains (e.g.
*.example.com) won’t work here
- Accept the ZeroSSL TOS and Let’s Encrypt SA and hit Next
- Download the Certificate Request (
domain-csr.txt) and save it somewhere - Hit Next
- Download the Account Key (
account-key.txt) and save it somewhere. - Hit Next
2. Verification
The ZeroSSL website now shows us the expected challenges (labelled as File) and responses (labelled as Text).
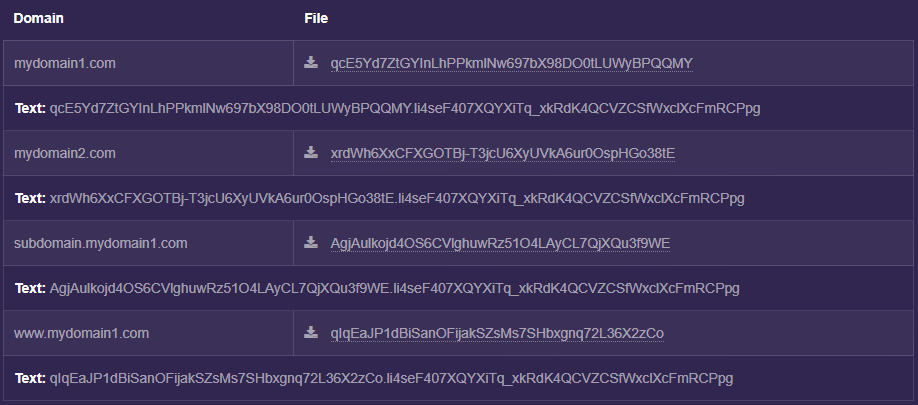
We need to set up our website(s) to return these expected responses, which we can do using the following PowerShell script.
$challengeResponses = (
    # TODO: Update this list with your domain(s), along with the challenge and response strings
    ("mydomain1.com", "challenge1", "challenge1.response"),
    ("www.mydomain1.com", "challenge2", "challenge2.response"),
    ("subdomain.mydomain1.com", "challenge3", "challenge3.response"),
    ("mydomain2.com", "challenge4", "challenge4.response")
)

$secret = "TODO: put your secret GUID here - the one you set in your LetsEncryptController"

foreach ($challengeResponse in $challengeResponses)
{
    $uri = "http://$($challengeResponse[0])/LetsEncrypt/ChallengeResponse"
    $body = "{secret: '$secret', challenge: '$($challengeResponse[1])', response: '$($challengeResponse[2])'}"

    Invoke-WebRequest -Uri $uri -Method POST -ContentType "application/json" -Body $body | Format-List -Property Content
}
One this is done, hit Next and wait a few seconds for ZeroSSL and Let’s Encrypt to verify your domain(s).
3. Certificate
If everything went well, ZeroSSL now presents us with two files.
-
domain-crt.txtthe certificate -
domain-key.txtthe private key
Download them and save them somewhere, ready for the next step.
Adding the Private Key
We’ll use OpenSSL to add the private key to the certificate.
At the command-line, run the following commands (from the folder where you saved domain-crt.txt and domain-key.txt) to generate a new file (has-private-key.pfx in the example below), that contains the private key:
set path="C:\Program Files\OpenSSL-Win32\bin"
openssl pkcs12 -export -in domain-crt.txt -inkey domain-key.txt -out has-private-key.pfx
Using the Certificate
We need to do three things with this certificate (has-private-key.pfx)
- Upload it to the Microsoft Azure Portal
- Add it to the Windows Certificate Store
- Refer to it in our Azure Cloud Service configuration
There may well be different/better ways of doing this, in particular step 2…
1. Microsoft Azure Portal
Starting at https://portal.azure.com
- Select Cloud Services (classic)
- Select your Cloud Service
- Under Settings, select Certificates then hit Upload
You will then be prompted to upload a certificate, so upload the one containing the private key (has-private-key.pfx) and when prompted enter the export password you used previously.
2. Windows Certificate Store
The certificate needs to be added to your PC’s Windows Certificate Store, so that Visual Studio can reference it. This is explained in a series of detailed steps over at Technet.
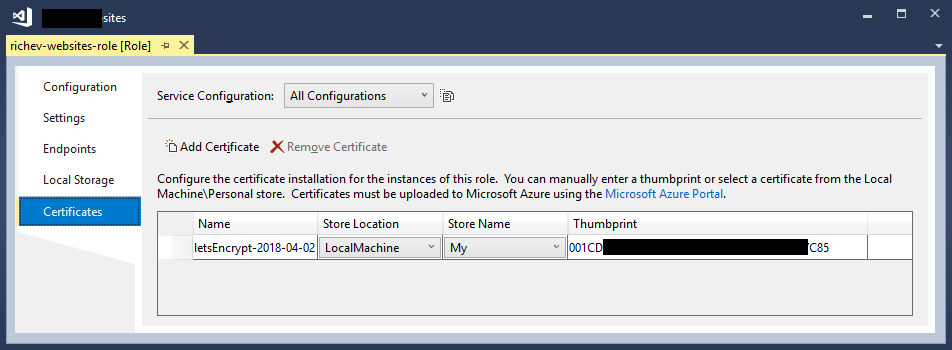
3. Azure Cloud Service Configuration
In Visual Studio, right-click your Cloud Service configuration, and add your certificate as illustrated below, using the thumbprint you noted down in step 1.
In your ServiceDefinition.csdef file, add HTTPS endpoints for all of the domains that the certificate is valid for. It should end up looking something like this.
<?xml version="1.0" encoding="utf-8"?>
<ServiceDefinition name="MyWebsites" xmlns="http://schemas.microsoft.com/ServiceHosting/2008/10/ServiceDefinition" schemaVersion="2015-04.2.6">
  <WebRole name="my-websites-role" vmsize="ExtraSmall">
    <Sites>
      <Site name="first-site" physicalDirectory="..\..\..\Richev.Example">
        <VirtualApplication name="portfolio-application" physicalDirectory="..\..\..\Richev.Example" />
        <Bindings>
          <Binding name="Endpoint1" endpointName="Endpoint1" hostHeader="mydomain1.com" />
          <Binding name="Endpoint1" endpointName="Endpoint1" hostHeader="www.mydomain1.com" />
          <Binding name="httpsEndpoint" endpointName="httpsEndpoint" hostHeader="subdomain.mydomain1.com" />
          <Binding name="httpsEndpoint" endpointName="httpsEndpoint" hostHeader="mydomain2.com" />
        </Bindings>
      </Site>
    </Sites>
    <Endpoints>
      <InputEndpoint name="Endpoint1" protocol="http" port="80" />
      <InputEndpoint name="httpsEndpoint" protocol="https" port="443" certificate="letsEncrypt-2018-04-02" />
    </Endpoints>
    <Imports>
    </Imports>
    <Certificates>
      <Certificate name="letsEncrypt-2018-04-02" storeLocation="LocalMachine" storeName="My" />
    </Certificates>
  </WebRole>
</ServiceDefinition>
Finally
Publish your website(s), and you should now be able to navigate to them using HTTPS. ![]()
Next Time
At https://zerossl.com/free-ssl/#crt, start off by pasting the Account Key (account-key.txt) into the left-hand input field, and the Certificate Request file (domain-csr.txt) into the right-hand input field. Then continue as before.
Troubleshooting
HTTP 503 error
If you get an HTTP 503 error page when navigating to your website using HTTPS this may be because the HTTPS endpoint binding isn’t set up correctly in your ServiceDefinition.csdef.
Written by Richard in 2018